uniapp小程序开发
1 | https://uniapp.dcloud.net.cn/ |
uni-app
1 | npm config set registry https://registry.npmmirror.com |
引入vant v2,参考https://vant-ui.github.io/vant/v2/#/zh-CN/quickstart
1 | npm i vant@latest-v2 |
1 | https://uniapp.dcloud.net.cn/ |
1 | npm config set registry https://registry.npmmirror.com |
引入vant v2,参考https://vant-ui.github.io/vant/v2/#/zh-CN/quickstart
1 | npm i vant@latest-v2 |
客户端无法正常tcp连接服务,使用telnet连接ip:port失败,但是有时候又可以成功。
之前以为是防火墙没有关的原因,设置iptables -t filter -I INPUT -p tcp –dport %d -j ACCEPT后,依旧无法连通,另外有时候又可以连通,如果是防火墙问题,肯定是无法连通的,所以排除防火墙问题。
为了确认网络确实是可以通的,tcpdump -i ppp108 -vv -w 108.pcap,拿到抓包数据放到wireshark打开看了下
确实是可以收到SYN包,但是服务端并没有回SYN+ACK,为什么不回呢?一般情况下,三次握手是在内核自动完成的,也就是SYN+ACK不是在应用层完成的。使用lsof -p看了下,端口是正常监听的。

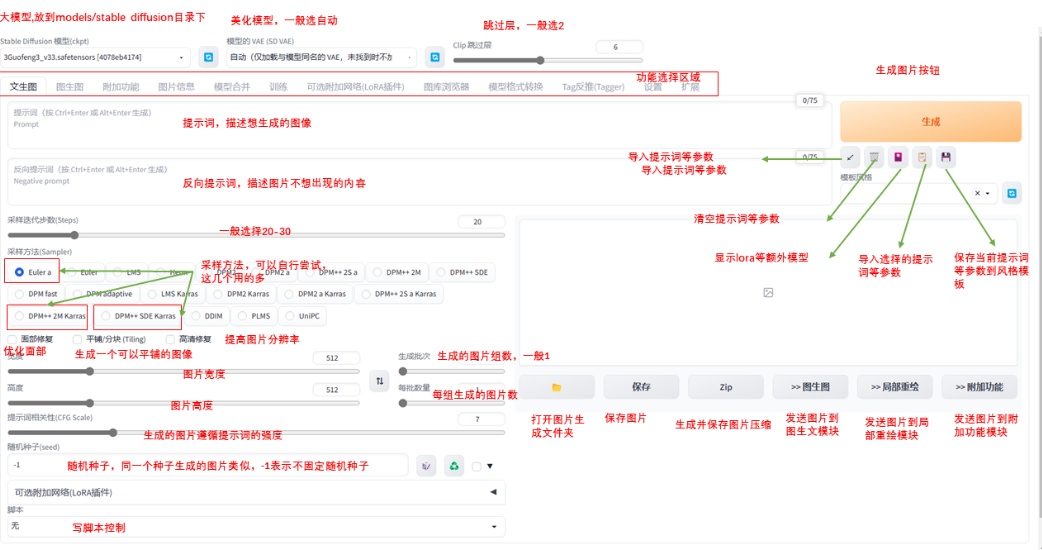
https://huggingface.co/lllyasviel/ControlNet-v1-1/tree/main
https://www.liblib.art/
真人图片就用:
majicmixRealistic,chilloutmix
其他就用:
revAnimated,realisticVision,deliberate
ControlNet负责更好地“控制”这个“模型”或画面,ControNet的作用是精细化控制整体图片的元素——主体、背景、风格、形式等,ControlNet就是你提供一张图片,然后选择一种采集方式,去生成一张新的图片
1 | template <typename T> |
上面的代码实现了一个简单的线程安全智能指针 ThreadSafePointer,它用于管理一个动态分配的对象(例如 int)。以下是代码的原理解释:
类模板定义:
ThreadSafePointer 类是一个模板类,可以管理不同类型的动态分配对象。成员变量:
data:指向实际数据的指针。ref_count:一个指向引用计数的指针。引用计数表示有多少个智能指针共享相同的资源。mutex:一个互斥锁,用于保护 data 和 ref_count 的访问。构造函数:
data 为 nullptr,ref_count 为 0,mutex 为一个新的互斥锁。data 指向该资源,初始化 ref_count 为 1,创建一个新的互斥锁。复制构造函数:
ThreadSafePointer 对象,该对象共享相同的资源。ref_count 和 mutex 在对象之间共享,以确保线程安全的引用计数。赋值运算符重载:
ThreadSafePointer 对象赋值给另一个对象。析构函数:
get 方法:
get 方法返回存储在 ThreadSafePointer 中的指向资源的原始指针。在获取指针时,它会获取互斥锁以确保线程安全。use_count 方法:
use_count 方法返回当前资源的引用计数,以确定有多少个智能指针引用了该资源。同样,它也获取互斥锁以确保线程安全。main 函数:
main 函数中,我们演示了如何创建和使用 ThreadSafePointer 对象来管理整数资源。创建一个 ThreadSafePointer 对象时,资源的引用计数初始化为 1。然后,通过复制构造函数创建第二个智能指针,两个智能指针现在共享同一资源,引用计数增加到 2。这个实现确保在多线程环境中正确管理资源的生命周期,通过使用互斥锁来保护引用计数和资源的访问,避免了竞态条件和资源泄漏。
EmailMultiAlternatives模块发送StringIO的数据作为csv的附件,在windows打开csv文件后乱码,修改如下部分后,附件为utf-8编码格式,所以在windows上打开csv文件是乱码的,因为wps打开默认是按ansi格式解码,但将csv文件在notepad中是可以正常打开的,因为notepad可以按照utf-8解码。
1 | b = make_header([('数据归档.csv', 'utf-8')]).encode('utf-8') |
可以在windows上将csv文件转码为asci格式的gbk编码,但是表情会变为问号,还不清楚是什么原因,或者将csv文件在手机wps打开,再另存为xls文件,再发给电脑就好了,但是很麻烦。
本程序旨在通过检查当前网络是否支持 IPv6 服务,以及判断指定的网络接口是否拥有全局 IPv6 地址。以下是程序的主要思路和函数概述。
getInterfaceNameFromSockaddr1 | std::string getInterfaceNameFromSockaddr(const struct sockaddr_in &sockAddr) |
第一段四句:
Nowadays, an increasing number of people are concerned about 题目关键词 all over the world.
However,whether 辩论两边观点(单边观点也行) is a controversial issue.
From my perspective, it exerts an adverse/ a profound impact on (government, environment,关键词涉及的人事物都可以)
Therefore, sb should pay more attention to … rather than …
第二段三句:
To begin with, it is undeniable that… plays a significant role in…, such as…
That is,… (改写第一句话)
As a result,… (表结果,可以跟给的例子有关,没关也行), which will lead to…
第三段四句:
1 | gpt prompt: |
Today, I am preparing to write an article to improve my English level, I hope it will have a positive effect on my English level. The main reason is that I will have a PTE exam in a few weeks. The PTE exam is divided into listening, reading, speeking, and writing parts, I feel week in all parts. I want to achieve a good score because I intend to work in Australia. My goal is to score at least 65 points in all parts, which would classify my English as proficient. It’s a big challege for me because I haven’t been lerning English since I graduated from university. I look forward to having a life of freedom, but I find myself working from home every day. Moreover I’m concerned that if I don’t take this seriously, I might lose my job by the time I turn 35. Therefore, I’m exploring solutions to potentially move to Australia.
I’ve writen down some words and handled them over to ChatGPT for sentence optimization, this way, I aim to enhance my ability to express myself in English. Effective communication requires a long grasp of expression. For instance, the ability to quickly organize sentences on the spot, without prolonged pauses for thought.
I’ve acquired 200 new words, I plan to learn an aditional 200 every day. This is primarily to improve my ability to pronounce them quickly, as I might encounter them in the reading section of the PTE exam, allowing me to read more fluently.